CN

×

keywords:

xxxx1 xxx2 xxx3 xx4 copy
Shenzhen Meiyad Optoelectronics Co., Ltd. Shenzhen Meiyad Optoelectronics Co., Ltd.

News

In-depth Analysis of Special-Shaped LED Display Screens

19
11
2024

Table of Contents

\n

Why Are Special-Shaped LED Displays So Popular?

\n

\n

\n

In this era of information overload, visual communication has become more important than ever. Whether in advertising, stage performances, conferences, or various public events, displays play a crucial role. However, traditional rectangular LED displays can no longer meet the diverse needs or provide the engaging visual experiences required by emerging markets. Against this backdrop, special-shaped LED displays have emerged and quickly carved out their niche in the market. But why are special-shaped LED displays so popular? What market needs do they fulfill?

\n

\n

\n

1. Driven by Innovative Technology

\n

\n

\n

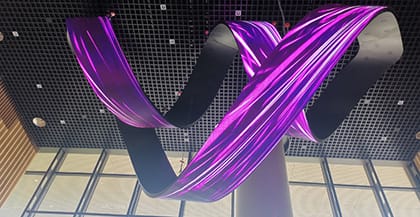
LED display technology has developed rapidly in recent years. From traditional monochrome screens to full-color displays, and from simple flat panels to today's special-shaped designs, technological innovation has been the driving force. The popularity of special-shaped LED displays is largely due to their ability to be customized into various shapes and sizes based on specific needs, breaking the boundaries of traditional screens. For example, they can be made into round, curved, wavy, or even spherical shapes. These innovative designs open up endless possibilities for applications in various scenarios.

\n

\n

\n

2. Strong Visual Impact

\n

\n

\n

Special-shaped LED displays have a strong visual impact, which is one of the main reasons they have quickly captured the market. Due to their unique design, they immediately attract the attention of the audience, creating richer visual effects compared to flat screens. This visual impact is particularly noticeable in commercial advertising and stage performances. For example, a surround immersive LED display can create a more immersive and dramatic visual experience for stage performances, making the audience more engaged in the event.

\n

\n

\n

\n

\n

\n

3. Enhancing Brand Image

\n

\n

\n

For businesses and brands, special-shaped LED displays are not only a tool for showcasing content but also a means of building brand identity. Through unique and customized designs, companies can effectively convey their brand values and culture, leaving a lasting impression on their audience. This is especially true for high-end brands that require distinctive marketing strategies. Special-shaped LED displays offer a unique way to showcase products, thereby enhancing the brand's image as professional and innovative.

\n

\n

\n

\n

\n

\n

4. Versatility and Flexibility

\n

\n

\n

Special-shaped LED displays are not only breakthroughs in appearance but also highly flexible and adaptable in function. They can be used in commercial advertising, digital exhibition halls, cultural events, sports venues, and more. This versatility allows them to be tailored to meet the specific needs of different users. For example, in large commercial complexes, special-shaped LED displays can add dynamism and fun to the space, attracting more foot traffic.

\n

\n

\n

5. Strong Adaptability

\n

\n

\n

Special-shaped LED displays have high adaptability and can be designed to fit various spaces and environments, overcoming the limitations of traditional LED displays in terms of installation and usage in complex settings. For example, in environments like building facades, columns, or indoor and outdoor shopping malls, special-shaped LED displays can better integrate with the overall design, enhancing the aesthetic appeal and visual effects. This adaptability makes them more flexible in terms of project design and implementation.

\n

\n

\n

6. Advances in Materials and Manufacturing Processes

\n

\n

\n

With continuous advancements in material technologies and manufacturing processes, special-shaped LED displays have seen significant improvements. Not only are the display effects clearer and brighter, but their durability and reliability have also greatly improved. Advanced materials and manufacturing processes ensure that these displays can operate stably under various environmental conditions, overcoming the performance limitations of traditional displays in harsh settings. These improvements have effectively extended the lifespan of the displays and reduced maintenance costs.

\n

\n

\n

7. Interactivity and User Engagement

\n

\n

\n

Modern consumers increasingly prioritize interactive experiences, and special-shaped LED displays meet this demand. By integrating interactive technologies such as touch sensing and gesture recognition, the audience can interact with the display, which enhances user engagement and experience. This interactivity is especially appealing in public spaces such as shopping malls and exhibition halls, where people are more likely to actively engage with the content, thus increasing audience satisfaction and attention.

\n

\n

\n

\n

\n

\n

8. Growing Market Demand

\n

\n

\n

As technology continues to improve and consumer demands become more diverse, the market demand for special-shaped LED displays is growing. They are not only being used in traditional fields like commercial advertising and stage performances but also in emerging areas like smart cities and interactive displays, showing broad market prospects. For example, in the development of smart cities, special-shaped LED displays can be used for urban information dissemination, navigation guidance, and more, becoming an integral part of the city's infrastructure.

\n

\n

\n

In conclusion, the popularity of special-shaped LED displays is not coincidental. It is the result of a combination of factors, including technological innovation, strong visual impact, brand image enhancement, versatility, adaptability, advances in material and manufacturing technologies, interactivity, and growing market demand. Looking ahead, as technology continues to evolve and application scenarios expand, special-shaped LED displays will play an increasingly important role in various industries.

\n

\n

\n

What Is the Difference Between Special-Shaped LED Screens and Ordinary LED Screens?

\n

\n

\n

In today's display field, LED screens are increasingly being used, and LED special-shaped screens have gradually become the new favorite in many scenarios due to their unique shapes and strong visual impact. So, what is the difference between special-shaped LED display screens and ordinary LED screens?

\n

\n

\n

1. Appearance

\n

\n

\n

Ordinary LED screens are usually rectangular or square, which are quite regular and meet traditional display requirements. Special-shaped LED screens, on the other hand, break through these traditional shape restrictions. They can be made into various irregular shapes, such as circles, triangles, polygons, arcs, and even three-dimensional shapes, based on specific scene and design requirements.

\n

\n

\n

\n

\n

\n

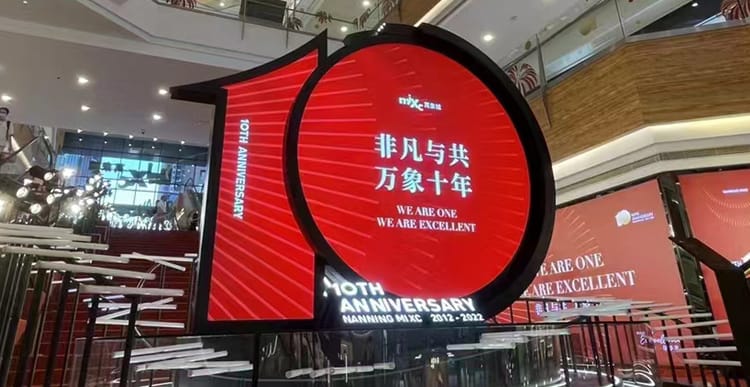
For example, in art exhibition venues, special-shaped LED screens can be designed in unique artistic forms, perfectly integrating with the exhibition content and providing a fresh visual experience for the audience. In shopping mall atriums, flexible LED screens can better fit the building structure and enhance the beauty and modernity of the space.

\n

\n

\n

\n

\n

\n

\n

\n

2. Installation Method

\n

\n

\n

The installation method of ordinary LED screens is relatively simple, typically involving wall mounting, hoisting, or floor brackets. However, due to the special shapes of special-shaped LED screens, the installation method often needs to be customized based on the screen's specific form and the environment in which it will be installed.

\n

\n

\n

For example, some curved LED screens may require special installation structures and fixation methods to ensure the screen's stability and safety. Additionally, during the installation process, considerations such as heat dissipation and maintenance must be taken into account, which adds complexity and difficulty to the installation of special-shaped LED screens.

\n

\n

\n

3. Display Effect

\n

\n

\n

When it comes to display effects, there are notable differences between ordinary LED screens and special-shaped LED screens. The pixel distribution on ordinary LED screens is relatively uniform, creating a regular display. However, due to the irregular shapes of special-shaped LED displays, the pixel distribution may be uneven. Special processing is required during the design and production phases to ensure the quality and effectiveness of the display.

\n

\n

\n

Moreover, special-shaped LED screens can achieve more three-dimensional and realistic visual effects through special design techniques and technologies. For example, by applying 3D technology and dynamic special effects, they can provide a more impactful visual experience for the audience.

\n

\n

\n

\n

\n

\n

4. Application Scenarios

\n

\n

\n

Ordinary LED screens are primarily used in traditional display settings, such as conference rooms, shopping malls, stations, and airports. Special-shaped LED screens, by contrast, are more commonly used in creative and personalized environments, such as theme parks, science museums, art exhibitions, and high-end commercial spaces.

\n

\n

\n

For example, in theme parks, special-shaped LED screens can be molded into various imaginative shapes and combined with amusement facilities, offering tourists a more immersive experience. In science museums, special-shaped LED screens can display scientific phenomena and data, providing a more intuitive understanding of scientific concepts.

\n

\n

\n

\n

\n

\n

5. Production Cost

\n

\n

\n

Due to the relatively complex production process and installation challenges associated with special-shaped LED screens, their production cost tends to be higher than that of ordinary LED screens. Additionally, special-shaped LED screens are highly customizable and must be designed and manufactured according to specific requirements, which further increases their cost.

\n

\n

\n

However, with the continuous advancement of technology and the expanding market, the cost of special-shaped LED screens is gradually decreasing. In the future, special-shaped LED screens are expected to become more widely used and could become a new trend in the display industry.

\n

\n

\n

In summary, there are several key differences between special-shaped LED screens and ordinary LED screens, including appearance, installation methods, display effects, application scenarios, and production costs. When choosing the right screen, it’s essential to consider your specific needs and context to achieve the best display effect and maximize the screen's value.

\n

\n

\n

How to Find a Suitable Creative LED Screen Manufacturer?

\n

\n

\n

In this era of information explosion, the importance of visual communication has become increasingly prominent. Creative LED screens have been warmly welcomed across various industries due to their vivid colors, clear images, and strong versatility. However, with numerous manufacturers in the market, selecting the right creative LED screen manufacturer has become a challenging task for many buyers. Meiyad will introduce several key factors to consider when choosing a creative LED screen manufacturer to help you make a wise and informed decision.

\n

\n

\n

\n

\n

\n

1. Assess the Professionalism of the Manufacturer

\n

\n

\n

When selecting a creative LED screen manufacturer, the first factor to consider is professionalism. Professional manufacturers typically have rich industry experience and can provide strong support in areas such as technology research and development, material production, and product design. To evaluate a manufacturer’s recognition and credibility within the industry, check their official website, product lineup, and case studies. It is advisable to choose manufacturers with relevant certifications and awards, as these can reflect their level of professionalism and industry standing.

\n

\n

\n

2. Inspect Product Quality

\n

\n

\n

Product quality is one of the most critical factors when choosing an creative LED screen manufacturer. Before making a purchase, make sure to personally inspect the actual performance of their products, such as brightness, color accuracy, image clarity, viewing angles, and more. High-quality creative LED screens should not only perform well in daylight but also be vibrant and visually impactful at night. Additionally, it is important to verify the source of the manufacturer’s materials. Choose manufacturers who use high-quality raw materials to ensure the durability and long-term stability of the product.

\n

\n

\n

3. After-Sales Service Guarantee

\n

\n

\n

While using creative LED screens, it is inevitable that some technical issues may arise. Therefore, choosing a manufacturer that provides excellent after-sales service is crucial. A reliable manufacturer should offer comprehensive after-sales support, including but not limited to technical assistance, product repairs, and warranty policies. When reviewing the manufacturer's after-sales service policies, it is recommended to obtain written agreements, not just verbal promises, to ensure you receive effective protection when you need it.

\n

\n

\n

4. Customization Capabilities and Flexibility

\n

\n

\n

With the growing demand for diversification and personalization, customization has become a major trend. Leading creative LED screen manufacturers should have robust customization capabilities and be able to tailor products to meet specific customer needs. From the initial design to final product delivery, the entire process should run smoothly. Flexibility is also essential because the market environment is constantly changing. Manufacturers who can respond quickly and provide adaptable solutions are typically more reliable.

\n

\n

\n

5. Customer Reviews and Reputation

\n

\n

\n

Customer reviews and word-of-mouth reputation are also crucial factors to consider. Online platforms, social media, industry forums, and other channels offer valuable insights from real users about various creative LED screen manufacturers. These reviews can provide a clearer understanding of product performance and service quality. Opting for manufacturers with high customer ratings and good reputations will not only minimize risks but also create a solid foundation for future cooperation.

\n

\n

\n

Choosing the right creative LED screen manufacturer is not a decision to be made hastily; it requires a thorough evaluation of multiple factors. By assessing professionalism, product quality, after-sales service, customization capabilities, and customer reputation, you will be better equipped to find a manufacturer that aligns with your needs. As a leader in the industry, Meiyad has helped various sectors convey information more efficiently and beautifully with its advanced technology, rigorous quality control, thoughtful customer service, and strong market reputation.

\n

\n

\n

How to Successfully Customize a Special-Shaped LED Screen? Detailed Steps and Precautions

\n

\n

\n

With the rapid development of technology, special-shaped LED screens have become the go-to choice for many companies and individuals, especially in fields such as advertising, art exhibitions, and creative designs. Their unique appearance and versatile functions make them incredibly popular. However, customizing special-shaped LED screens involves many factors, not only technical implementation but also aspects like design aesthetics, budgeting, and post-maintenance. Meiyad will explain in detail how to successfully customize special-shaped LED screens, along with important precautions to help you avoid misunderstandings during the process. This guide will help you find the most suitable solution, whether you’re a company new to this field or a designer aiming to enhance your brand image. Mastering these steps and considerations will ensure a smoother project execution. Through examples and shared experiences, you will gain a better understanding of the customization process and ensure that the final product meets both practical needs and visual expectations.

\n

\n

\n

1. Clarify Your Needs and Goals

\n

\n

\n

Before starting the customization process, the first step is to clearly define your needs and goals. What effect do you want to achieve? Is it a simple visual display or a more interactive experience? Clear objectives will guide your decisions regarding design and technical requirements. Some important questions to consider include: Who is the target audience? What message do you want to convey? These factors will directly affect the size, shape, resolution, and other technical specifications of the screen. By conducting thorough market research and needs analysis, you can develop a more practical customization plan, making the later stages of the process smoother and more efficient.

\n

\n

\n

2. Choose the Right Supplier

\n

\n

\n

Once your needs are defined, the next step is to find a suitable supplier for your special-shaped LED screen. Choosing the right supplier is crucial, as it directly affects the quality and timeline of your project. It’s recommended to evaluate potential suppliers based on the following factors:

\n

\n

\n

Technical Capabilities:

Check their expertise and previous experience with special-shaped screens. Review their past cases to assess their ability to deliver the specific design you require.

After-Sales Service and Support:

Ensure the supplier offers reliable after-sales service and technical support to address any issues that may arise during product use.

Reputation and Strength:

Opt for a supplier with strong capabilities to ensure the overall quality of your project. Avoid choosing solely based on price, as this could compromise the quality of the final product.

\n

\n

\n

\n

\n

\n

3. Communication and Feedback During the Design Stage

\n

\n

\n

The design stage is critical in the customization process. It's essential to maintain clear and constant communication with the design team. Be sure to express your ideas, brand style, and other requirements in detail so they can be fully incorporated into the design. Regular feedback is also important during this phase, as it allows you to spot potential issues early and make necessary adjustments. This continuous communication helps ensure that the design is both creative and aligned with your needs, minimizing the need for costly and time-consuming revisions later.

\n

\n

\n

4. Technical Implementation and Testing

\n

\n

\n

Once the design solution is finalized, the project moves to the technical implementation stage. This phase involves selecting hardware, developing software, and actually producing the screen. When selecting hardware, factors such as display quality, durability, and energy efficiency must be considered. For software development, ensure compatibility with your intended use and focus on optimizing the user experience.

\n

\n

\n

In addition, rigorous testing of the final product is essential. Regular checks during production will help ensure that the screen’s display quality meets your expectations and that all functions are operating smoothly. This testing process will help prevent issues during the later stages of use.

\n

\n

\n

5. Post-Maintenance and Updates

\n

\n

\n

Customizing a special-shaped LED screen is not a one-time event; post-maintenance and updates are equally important. Regular inspection and maintenance are necessary to ensure the screen remains in good working order and continues to provide excellent display quality. Additionally, as technology advances and market demands change, updating the content and features of your screen is essential to keep it relevant and engaging. This will not only maintain its appeal but also enhance the audience’s sense of participation and extend the lifespan of the LED screen.

\n

\n

\n

Maintaining good communication with your supplier and obtaining professional maintenance support will ensure that your special-shaped LED screen continues to deliver value long after installation.

\n

\n

\n

By following the steps outlined above, you will have a clearer understanding of how to successfully customize a special-shaped LED screen. Key steps such as clarifying your needs, choosing the right supplier, fostering strong communication, ensuring technical implementation, and focusing on post-maintenance are all crucial to a successful project. We hope this guide helps you better understand the process and empowers you to create a unique and impactful visual experience that captivates your audience.

\n

\n

You May Also Like

Outdoor LED Display Installation Guide | GE500 Series by Meiyad

14|07|2026

Outdoor LED Display Installation Guide: A Complete Guide to GE500 Series

Installing an outdoor LED display requires more than simply mounting LED cabinets together. A professional installation process directly affects the display’s stability, visual performance, waterproof reliability, and long-term service life.From steel structure preparation and cabinet alignment to electrical testing and maintenance planning, every step plays an important role in ensuring reliable operation in outdoor environments.The GE500 Series outdoor LED display by Meiyad is designed to deliver installation efficiency and long-term performance. Featuring an aluminum profile cabinet design, excellent heat dissipation, multiple pixel pitch options, energy-saving design, and flexible maintenance features, GE500 provides a reliable solution for commercial outdoor display applications.This guide explains the key steps and considerations for outdoor LED display installation, helping installers and project teams better understand the GE500 structure, preparation requirements, and installation process.Safety TipsWarning! Before installing, powering on, operating, or debugging this product, carefully read the safety precautions provided in this section.Warning NoticeEnsuring Safety - Please carefully read and adhere to the following safety instructions:The equipment complies with the standard GB4943.1-2022.The equipment is safe for use in regions at altitudes below 5000 meters.The plug serves as a disconnecting device. The socket-outlet should be installed near the equipment and must be easily accessible.Do not place exposed ignition sources, such as lit candles, on the equipment.Do not use the product in high-temperature or high-humidity environments. Use the product in low-dust areas and avoid direct exposure to sunlight.Do not attempt to modify, repair, or disassemble the product on your own. Improper handling may lead to short circuits, product damage, or even fire. Unauthorized modifications will void the product's warranty.GE500 Product Overview: Designed for Outdoor LED Display ApplicationsExcellent Heat DissipationAluminum profile cabinet and aluminum module chassis provide excellent heat dissipation performance. Contact-type thermal conductive silicone pads improve heat transfer efficiency and accelerate heat dissipation.Aluminum profile heat dissipation is 2× better than die-cast aluminum, Die-cast aluminum is 2× better than sheet metal cabinets.Energy SavingSaves 35% energy compared to conventional screens. Reduces operating costs while maintaining excellent display performance. Supports green and low-carbon applications.Front & Rear Maintenance DesignEasy operation fast installation and maintenance, truly saves time, labor, and effort.Waterproof & DustproofDesigned with waterproof and dust proof structure. Protection level: Front & Rear IP65+. Resistant to rain, wind and dust, suitable for outdoor environments.The series is suitable for applications such as:Outdoor advertising displaysCommercial building facadesPublic information screensLarge-scale digital signage projectsGE500 Technical Parameters You Should Know Before InstallationModelP2.97P3.91P4.81P6.25P7.81P10.42Pixel Pitch (mm)2.973.914.816.257.8110.42Module Size (mm)500*250Module Resolution (dot)168*84128*64104*5280*4064*3248*24Pixel ConfigurationSMD1415SMD1921SMD1921SMD2727SMD2727SMD2727Scan Mode(s)1/211/161/131/51/41/2Refresh Rate (Hz)≥3840Gray Scale (bit)14Brightness (nits)≥4500≥4500≥4500≥6000≥6000≥6000Viewing Angle (°)140/140Cabinet Size (mm)1000*1000*75Cabinet Weight (kg)25Cabinet Resolution (dot)336*336256*256208*208160*160128*12896*96Ingress Protection (IP) RatingIP65Input Voltage110-220V; AC +10%Maintenance MethodFront and rear maintenanceNote:Product images are for reference only. The actual product (including but not limited to appearance, color, and dimensions) may vary slightly. Please refer to the product as specified in the actual order drawings.The specifications and parameters provided in this document are reference values. Some data are obtained from tests conducted in Meiyad's internal laboratory under specific conditions. Actual performance may vary due to differences in product batches, configurations, controller versions, and usage environments.Product Installation PrecautionsWarning: Before installing the steel structure, clearly mark the safety zone and cordon it off. Safety first! Please be sure to read, understand, and comply with all safety instructions.The construction site must implement all necessary safety measures, including the proper use of hard hats, safety harnesses, and safety nets. At the same time, temporary electrical usage regulations must be strictly followed.Precautions for Unpacking and Inspection1) Unpacking and Removing the Display ScreenStep 1: Open the top cover of the wooden case and remove the cabinet.Step 2: Remove the anti-static/moisture-proof plastic bag.Step 3: Open the rear cover of the cabinet and check whether all screws, cables, and power cords are loose or detached.Step 4: Inspect the cabinet for any deformation or damage caused during transportation.2) Installation PrecautionsA: When removing the display cabinet from the wooden case, handle it with care. Ensure a protective layer (e.g., paper or carpet) is laid on the ground to avoid collisions with the display lamp surface during.B: During installation, do not use iron tools/hammers to strike the cabinet or employ rough methods such as kicking.C: If the gap between cabinets is too large during installation, use a hard object to pad and ensure parallelism and verticality (note: the gap between cabinets should be less than 0.1mm).Power Supply System TestNote: (The inspection of the power supply in the distribution cabinet and the cabinet power supply must be performed by qualified electricians.)A. Check for short circuits between the Live (L) wire, Neutral (N) wire, and Ground (FG) wire.B. Check for short circuits between the Neutral (N) wire and the Ground (FG) wire. The resistance value should be ∞.C. Check for short circuits between the receiving card +4.2V power supply and GND (30–50Ω) terminals, Ground (FG) wire, Live (L) wire, and Neutral (N) wire. The resistance value should be ∞.D. Check for short circuits between the receiving board GND, Ground (FG) wire, Live (L) wire, and Neutral (N) wire. The resistance value should be ∞.E. Test for short circuits between the +4.2V output and GND of each power supply. The resistance value should be 30–50Ω.LED Display Installation PrecautionsA. After installation, the display screen must be equipped with lightning protection. A surge protector must be installed at the main power input terminal.B. Never perform live operations on the display screen.C. During the fixation of cabinets, ensure they are securely fastened while avoiding collisions that may cause damage to the product.D. Workers must adopt safety measures during installation (e.g., wearing protective helmets, safety harnesses, etc.).E. When removing control system boards or other equipment, take anti-static precautions (e.g., wearing anti-static gloves).Installation InstructionsA. This product is designed for outdoor use. Store it properly before installation.B. To ensure safety, the product must be installed by professional technicians.C. Before installation, disconnect the power supply and check whether the insulation layer of the power cord is intact.D. Ensure the reliability of the product and the installation structure. Verify that the structure is stable and secure before installation to avoid potential safety hazards.E. During installation, prioritize safety. Ensure the bracket is stable and the installers are safe to prevent potential risks.F. Grounding must be installed to ensure the safety of personnel and equipment.G. Only professional technicians are allowed to perform repairs on this product.Core Points of Cabinet Installation1. Structural Stability and FlatnessA. Benchmark Positioning: First, determine the center point and reference lines of the display screen. Install the cabinets starting from the center and moving outward to ensure overall symmetry.B. Layer-by-Layer Installation: It is recommended to install the cabinets from bottom to top, layer by layer. After completing each layer, check its levelness and alignment with the steel structure.C. Leveling Tools:Use high-precision tools such as magnetic-mounted laser levels to monitor the flatness of the cabinet surface in real time during installation. Avoid relying solely on visual inspection.D. Even Force Distribution:When tightening the cabinet connection screws, adopt the "diagonal tightening" method. Tighten the screws gradually and in multiple stages to ensure even force distribution between the cabinets and the steel structure, as well as between adjacent cabinets. This prevents deformation caused by excessive stress at any single point.Warning: The horizontal and vertical flatness of each cabinet / each layer must be properly adjusted before proceeding to the next step. Poor cabinet flatness may result in noticeable "dark lines" or "bright lines" (gaps) between display modules, severely affecting viewing quality and making subsequent adjustments difficult.2. Waterproof Sealing TreatmentA. Waterproof Gaskets: After the complete installation or maintenance of the screen, inspect the waterproof gaskets on the rear cover of the cabinets for detachment or deformation. If any abnormalities are found, replace the gaskets promptly to prevent internal water damage to the display.B. Backside Waterproofing: For displays with maintenance access at the back or wall-mounted displays, all maintenance doors and decorative structures must be sealed and waterproofed to prevent long-term corrosion of the screen structure or cabinets by rainwater.3. Heat Dissipation and Ventilation AssuranceA. Ventilation Pathways: During installation, ensure that the air intake and exhaust vents designed on the back of the cabinets are not blocked. Maintain clear and unobstructed cooling air channels.B. Cooling Measures: If the display design includes a backside ventilation pathway, ensure air convection within the channel. Avoid installing the cabinets directly against airtight walls, and leave sufficient space for heat dissipation. Depending on the ambient temperature, additional convection fans or air conditioning may be installed to enhance cooling.Post-Installation Inspection and TestingWarning: After the installation of the display screen is completed and all cables are connected, a comprehensive cable test and inspection must be performed before powering on the system.A. Physical Structure Re-inspection: After the installation of the steel structure and cabinets, recheck all screws to ensure they are properly tightened and verify the stability of all welding points.。B. Waterproofing Review: Carefully inspect all sealed areas to ensure the application is complete, with no missed or interrupted sections.。C. Insulation and Short Circuit Test: Use a multimeter to measure the power input terminals and ensure no short circuits are present.。D. Power-On Test: After supplying power, check whether the cabinet power supply is functioning normally and confirm that all power indicators are lit. (This must be done immediately after powering on to promptly identify any abnormal circuits and prevent potential equipment damage.)E. Troubleshooting: After debugging, display white, red, green, and blue colors on the LED screen to test for any damaged or malfunctioning modules. Replace or repair faulty modules as necessary.Installation Accessories and ToolsGE500 Cabinet / Module IntroductionProduct DimensionsThe GE500 cabinet measures 1000mm in width, 1000mm in height, and approximately 99mm in thickness.The module kit is manufactured using die-cast aluminum integrated molding, with dimensions of 500mm in width, 250mm in height, and 24.15mm in thickness.Each cabinet is arranged with 2 modules in width and 4 modules in height, totaling 8 modules to form a complete cabinet unit.Cabinet / Module Function IntroductionRear View of CabinetCabinet Exploded ViewRear View of ModuleFront View of ModuleStep-by-Step GE500 Outdoor LED Display Installation ProcessSteel Structure InstallationWarning: Before installing the steel structure, clearly mark the safety zone and cordon it off. Safety first! Please be sure to read, understand, and comply with all safety instructions.The construction site must implement all necessary safety measures, including the proper use of hard hats, safety harnesses, safety nets, fire extinguishers, fire blankets, etc. At the same time, temporary electrical usage regulations must be strictly followed.The GE500 series products support both front and rear installation methods, with some structural and accessory variations.The GE500 series is typically applied in front-installation wall-mounted setups. Meiyadi can provide customers with steel structure installation drawings.1. Site SurveyThe pre-sales engineer assesses the installation environment to determine the installation method, screen steel structure dimensions, and fixation approach.2. Data Compilation & Drawing PreparationCollate on-site measurement data and customer/user requirements, and provide them to the pre-sales engineer for generating steel structure drawings.3. Steel Structure FabricationFabricate and weld the steel structure according to the drawings, using embedded steel plates for integration.4. Steel Structure FixationSecure the steel structure to the wall using embedded steel plates or expansion bolts as specified in the drawings.5. Dimensional VerificationAfter steel structure installation, use a level or measuring tape to verify dimensions and positioning. Confirm accuracy before proceeding with cabinet installation.Important Notice:The drawings provided by our authorized engineers are for reference only if they have not conducted an on-site survey. Installation personnel must determine the appropriate types and quantities of fixing components based on the actual installation environment.Cabinet Installation (Front Installation Method)1. First Layer Cabinet Installation: Start from the center of the screen to install the first cabinet.2. Install cabinets incrementally to the left and right, using cabinet quick locks to secure the cabinets. Simultaneously, adjust the horizontal and vertical alignment at the junction of the two cabinets.Use cabinet connecting plates and bolts ①② to secure the two cabinets to the structure. (Place the connecting plate on the back of the square tube aligned with the holes, then insert the bolts from the front of the cabinet and tighten them into the connecting plate to lock the cabinets in place.)Conclusion: Professional Installation Ensures Long-Term GE500 PerformanceInstalling an outdoor LED display requires careful planning, accurate assembly, and professional testing.From product preparation and cabinet installation to waterproof protection and final inspection, every step contributes to the reliability of the finished display system.With its lightweight cabinet structure, modular design, efficient heat dissipation, and maintenance-friendly features, the GE500 Series by Meiyad provides an installation-efficient solution for outdoor commercial LED display applications.By following professional installation procedures, businesses and project teams can maximize display performance, reduce maintenance challenges, and ensure stable operation throughout the product lifecycle.

Four-Sided Immersive LED Installation at FM Global Centre, Singapore

06|07|2026

Four-Sided Immersive LED Installation at FM Global Centre, Singapore

Meiyad has delivered a four-sided immersive LED display project for FM Global Centre in Singapore, creating a fully integrated digital environment through P1.8 XC COB LED screen technology.The installation is composed of front, left, right, and ceiling LED surfaces, forming a complete spatial visual system that enhances architectural depth and digital interaction.The front screen measures 6600*3037.5 mm, serving as the main visual focus of the space. The left and right screens, each sized at 3000*3075.5 mm, extend the visual continuity on both sides. The ceiling screen measures 5400*2362.5 mm, completing the top enclosure and strengthening the immersive experience.Built with XC 1.8 COB LED panels, the system ensures stable performance, precise image expression, and reliable operation for long-term use in high-end commercial environments.This project demonstrates Meiyad’s capability in delivering complex multi-surface LED solutions that combine structural precision with immersive visual design, redefining how digital content integrates with architectural space.

Send Your Inquiry Today

Factory Direct LED Screen - Fast Quote, Best Price!

Please enter your company name
Please accept the data protection information

I have read and understood the  data protection   information.